|
The Department of Computer Science & Engineering
|
|
CSE 111: Great Ideas in Computer Science
|
The types of programs we've written so far for the Turing machine are what are usually called non-structured. This type of code is generally very difficult to read and understand. It really has very little to do with how we program in a modern high level (further abstracted from the machine) programming language. Corrado Böhm and Giuseppe Jacopini showed in 1966 that any non-structured program can be rewritten by combining three techniques: sequence, selection, and repetition (or loop). This is something we're familiar with and is how we've been writing our algorithms since we started, but now we can see the connection between the Turing machine and what we've been doing.
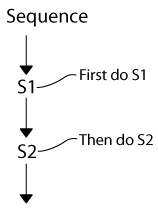
To review, sequence performs some operations S1; S2 meaning perform S1; then perform S2.
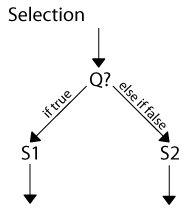
Selection says, if Q is true, then perform S1, else perform S2.
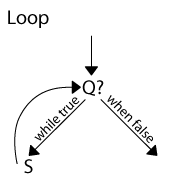
Loop says while Q is true, do S.
These are all the tools we need for structured programming. What we have been doing in class in writing our algorithms has been writing pseudocode. Pseudocode is structured programming, but with some of the details under-specified - especially the language specific ones. We're going to be learning Python, and the pseudocode we've been writing is somewhat similar to what we need to write in Python.
Specifically, we're going to be using the Jython Environment for Students (JES), which is an implementation of Python on Java. For details on how to install and use JES, see this page. There are several free books and tutorials about Python available on the internet. One which is quite good is Learn Python The Hard Way. If you're getting confused in class that might be a good place to look to try to clear things up.
Getting started with Python
We'll start by looking at a very simple Python program: Hello, World. We type "print "Hello, World!"" into the interactive python session, and the result is Hello, World! being printed to the screen.
Well, that was pretty easy! The next thing we'll do is make this into a function, which we can call any time we want. In the code editing window, we'll type the following program:
The only difference between this and what we just did is that we've now given this set of instructions a name we can refer to later. We now load the program and call the function by typing hello() in the interactive window:
Let's look at each of the structured programming concepts we've been using in the context of Python now. They look a little different, but the ideas are the same.
Let's start with sequence. We're going to write a function which adds two to a given number.
The "x = int(raw_input("Enter an integer: "))" asks the user to input an integer. You don't have to worry too much about how this particular function works, just know that's what it does, and when asked to use it be able to replicate it. The program then adds 2 to the value inputted and saves the result in the ans variable. It then returns ans. That is, it explicitly is declaring that the output of this function is ans. [Remember our function definition from the first lecture? This one would be <0, 2>, <1, 3> etc...]
Now we'll load the program and test our function.
>>> addtwo1()
Enter an integer: 5
7
>>> addtwo1()
Enter an integer: -4
-2
We'll write another version of this where the programmer calls the function and gives it a value for x:
This version doesn't ask the user for the input, but allows the programmer to explicitly define it. We can think of x as providing some input to the function, while ans is once again the output. We call x a parameter, and there can be more than one input in the parameter list.
>>> addtwo2(5)
7
>>> addtwo2(-4)
-2
This is a good time to discuss a bit bit about what goes in to writing a program from an idea we have. Lets start by defining a general problem. We want a program which when given a distance in miles, tells us how many kilometers that is. We should start by trying to learn as much as we can about the problem as possible. A quick Google search tells us that 1 mile is 1.609 kilometers.
The next thing we'll do is determine what the inputs and outputs of our program should be - in this case its easy - the input will be some number of miles, and the output will be the distance in kilometers.
Next, you need to worry about what happens between the input and output. We start by designing an algorithm. Write it out step by step as we have been during this course. Try to get the overall structure figured out along with what needs to happen at each step. For us this would look something like this:
Now you are ready to sit down and write your program in Python. Convert the algorithm you wrote into Python code:
Finally, if your code doesn't act as you expected check for typos in it, and if there aren't any, look back to the problem specification and the algorithm you developed to test whether you have made any errors.
So, the process goes like this:
In-Class Exercise: We are interested in converting Fahrenheit to Celsius. Follow the above process to produce a program to do this.
Our next topic is selection. We'll demonstrate selection with a program which says whether a number entered by the user is greater than zero, zero, or less than zero:
Our program first gets the input from the user and checks to see if x is less than 0, if it is, it prints that the number is negative. Then it checks if it is zero, and prints it is zero if it is. If both of these conditions are false, it prints that the number entered is positive.
In-Class Exercise: How would you modify this program to make it take an integer as input instead of asking the user?
In-Class Exercise: Write a program that determines if a number is odd or even. If the number is odd, write to the screen that it is odd. If the number is even, write to the screen that the number is even. To do this, you'll want to use the modulous operator in Python. You can imagine the modulous operator does long division and returns the remainder. In Python the modulous operator is the percent sign, for example:
Finally we'll look at loop.
When we use a for loop we're iterating through some array. We manufacture arrays sometimes using the range function. Lets start with something easy, we'll make a loop which just outputs the numbers in the array its given.
We read this as "for each x in range(5), print x". The output of this is:
Notice that range(5) is a function we are calling with the input of 5. The output will be used in the for loop. For example:
This works for any array, try this one:
Outputs:
In-Class Exercise: Can you make a for loop which outputs, one item per line, the five words that best describe your thoughts about this class? (Remember, text has to go in quotations!)
Let's look at a more complex example. To do this we'll use the same example we used earlier in the course where I asked you to trace a program which printed a square made of asterisks to the screen:
Now lets try our square function with input 5:
Now we have most of the basics we will use in our Python programs, we're just going to use them to do different things!
Turtle Worlds
Our first Python programs are going to be about turtles which we can draw on the screen and which have pens. The turtles move around the screen and mark their paths using the pen. They can pick up the pen or put it down in order to make neat designs.
The first thing we're going to do is create a world for our turtle to live in, we'll call it 'earth'. The size of our world is going to be 500 pixels by 500 pixels. We're also going to create a turtle to live in earth.
earth = makeWorld(500, 500)
myTurtle = makeTurtle(earth)
Next we're going to write a function which makes our turtle walk around in a square. We'll call this function "drawSquare". The first thing we need to do is pick up our turtles pen and move him to somewhere where he'll have more room to walk around - let's say 100, 100. Then the turtle puts his pen down, turns right, walks forward, and repeats until the square is done.
Our finished program is below:
def drawSquare():
In-Class Exercise: How could we replace some of this code with a for loop?
Let's do something a little more complex. We'll have two turtles which draw using different colors to make a a pattern of stars on a red background:
The first thing we'll do is make two turtles and a world:
Next we'll learn how we can change the background color of the world by having our turtle draw with a really, really big pen:
As you can see, this function takes a turtle as input. We then have that turtle perform our background drawing task. The turtle lifts its pen up and moves to the middle of the screen on the left side (that is X = 0, Y = 250). It changes its pen out for a really fat red one (500px - the height of the world!), puts its pen down and moves straight across to the other side of the world, painting it red.
Next we're going to make a function which has a turtle draw a white star. In order to do this, we have to understand the geometry of a star:
A star has 5 points. Therefore we split 180 into 5 parts (180/5 = 36). Therefore each point represents 36 degrees. When our turtle reaches the point, it must turn so the angle it draws is 36 degrees (so it turns 180-36 = 144 degrees).
We do this 5 times, and we have a star. Each line in our star will be 40 pixels, which is how far the turtle moves forward each time.
Okay, so now we can draw a star. We want to draw a bunch of them though! Lets say we want to draw 10 rows of 10 stars. We can do that with two for loops! Take a look at the completed program below:
earth = makeWorld(500, 500)
alex = makeTurtle(earth)
pam = makeTurtle(earth)
def drawStar(turtle):
def drawStarPattern(turtle):
drawBackground(alex)
drawStarPattern(pam)